Teaching math can be a challenge when abstract concepts like place value and number operations feel out of reach for young learners. One of the most effective tools to bridge that gap is the use of Base 10 Blocks. These simple, yet powerful manipulatives bring numbers to life, offering students a hands-on way to grasp foundational math concepts.
In this guide, we will explore everything educators need to know about using Base 10 Blocks.
What Are They?
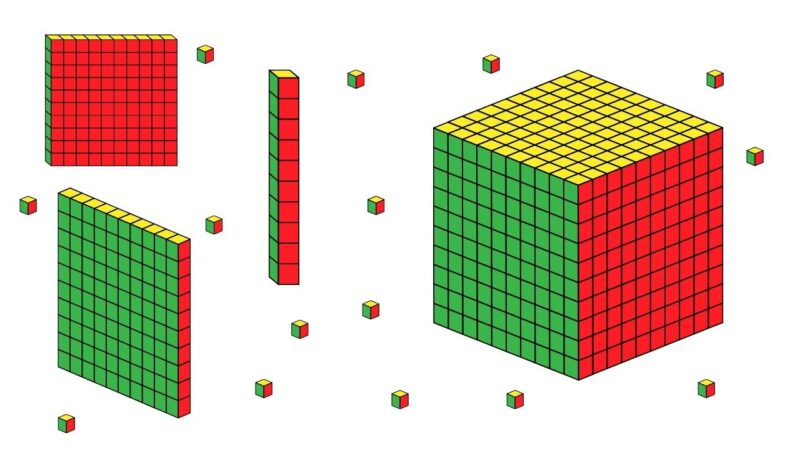
“Base 10 Blocks are manipulatives that visually represent units, tens, hundreds, and thousands, helping students understand place value and number operations through hands-on learning.”
Unit cubes measure one centimeter per side and represent a single unit. Ten of these cubes form a rod, which measures 10 centimeters in length, representing ten units. A flat consists of ten rods arranged into a square, equaling 100 units, and a large cube, which measures 10 centimeters per side, represents 1,000 units.
The beauty lies in their proportionality. The size of each block is directly related to its value. Ten unit cubes equal the size of a rod, ten rods make a flat, and ten flats make a cube.
Each place to the left of a number is ten times the value of the one to its right, and Base 10 Blocks visually reinforce this pattern.
More than just a tool for early learners, these blocks help students develop a concrete understanding of operations like addition, subtraction, multiplication, and division.
This can also be a great addition to Microlearning with games for your child.
How do They Help Students Understand Math?
Base 10 Blocks offer a powerful, hands-on approach to teaching foundational math concepts. By physically representing numbers, they make abstract ideas like place value, addition, and regrouping more accessible for students.
- Unit cubes to represent ones (e.g., 6 cubes for the number 6).
- Rods to represent tens (e.g., 3 rods and 4 units for the number 34).
- Flats to represent hundreds (e.g., 2 flats, 3 rods, and 5 units for 235).
Examples
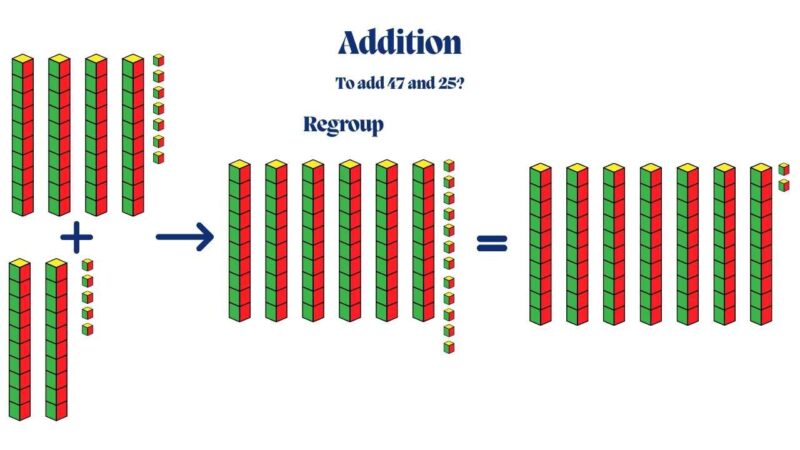
Addition:
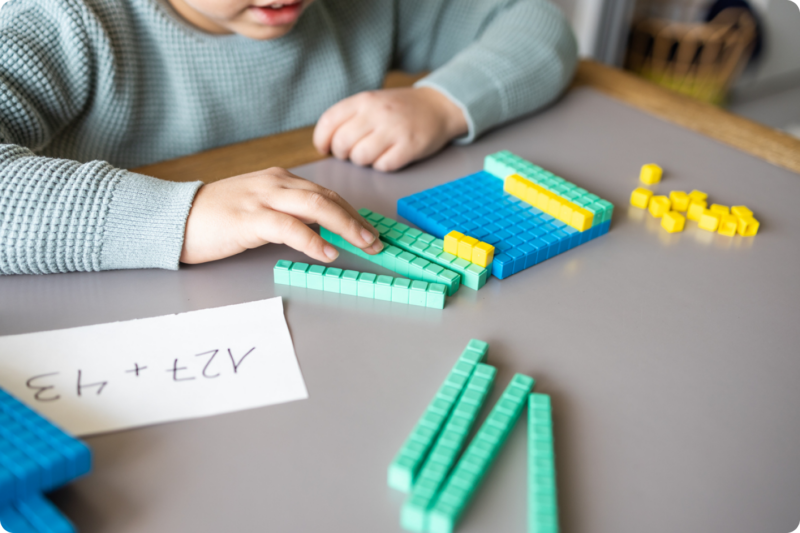
To add 47 and 25, students can represent 47 using 4 rods and 7 cubes. For 25, they use 2 rods and 5 cubes. They physically combine the blocks, regroup the extra ten units into a rod, and quickly see the sum of 72.
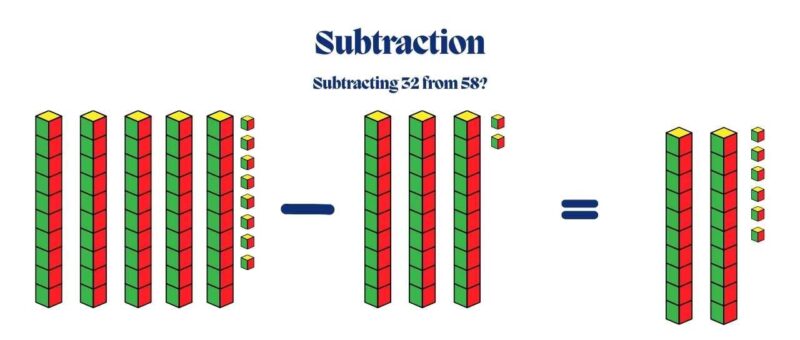
Subtraction:
Subtracting 32 from 58 can be visualized by placing 5 rods and 8 cubes for 58. When removing 3 rods and 2 cubes, students can see the result, 26, without confusion over regrouping.
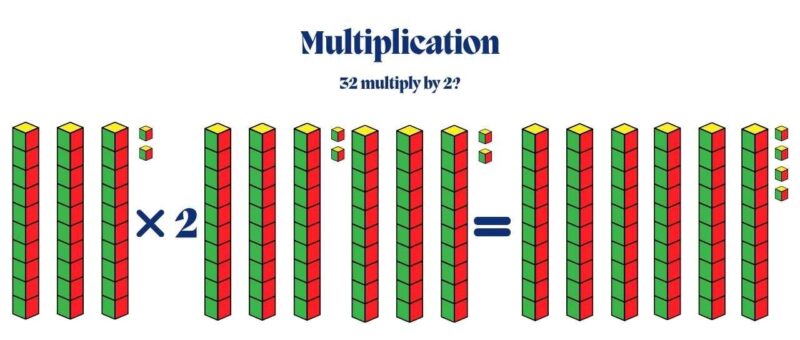
Multiplication:
Using 3 rods and 2 cubes for 32, students can multiply by 2 by duplicating the set. They can then count the combined blocks to see that 32 × 2 equals 64.
Also, check out this quiz designed for 7-year-olds.
Place Value
Place value is a foundational concept in math, and Base 10 Blocks are one of the best tools to help students visualize and understand it. By physically representing units, tens, hundreds, and thousands, students can see the relationship between different place values.
- 4 flats represent 400.
- 6 rods represent 60.
- 2 cubes represent 2.
Examples
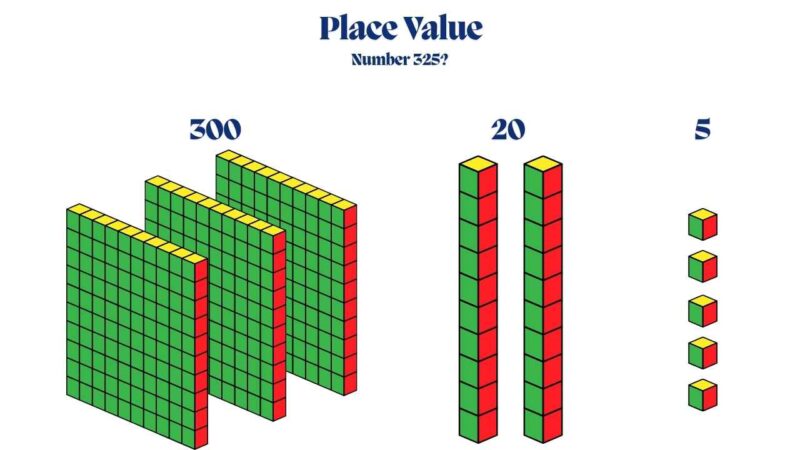
Place Value:
A number like 325 can be shown as 3 flats, 2 rods, and 5 units. Each block type clearly represents its corresponding place value, helping students see that the “3” in 325 represents 300, the “2” represents 20, and the “5” represents 5 ones.
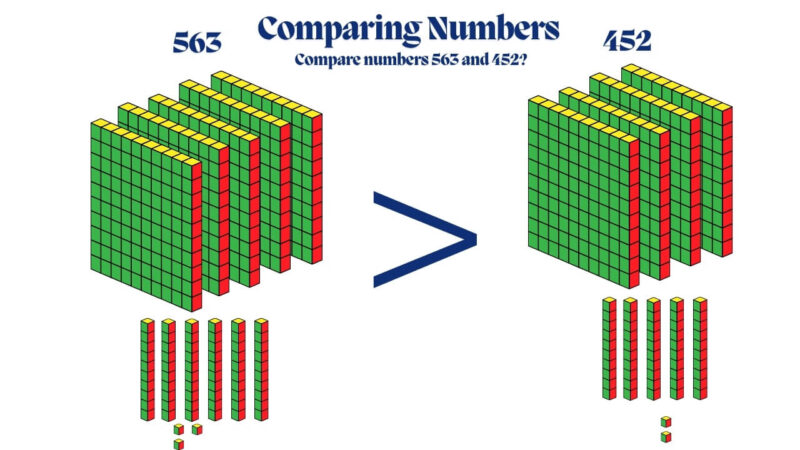
Comparing Numbers:
Using blocks, students can compare numbers like 563 and 452 by visually counting the number of flats, rods, and cubes for each number. They can easily see that 563 is larger because it has more flats (hundreds) and rods (tens) than 452.
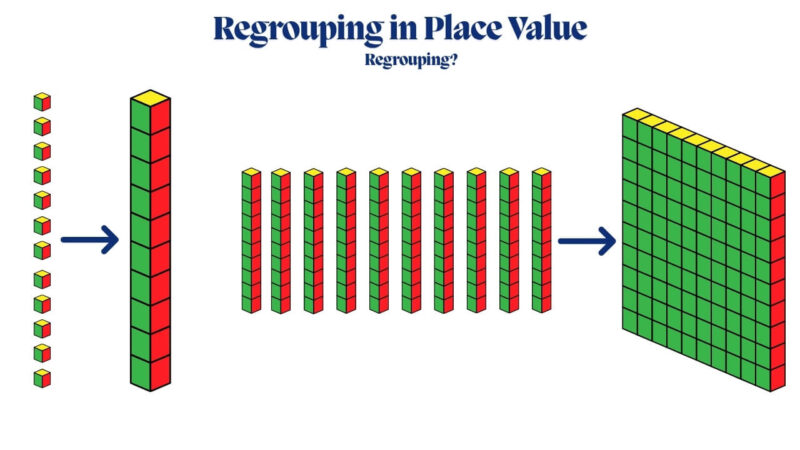
Regrouping in Place Value:
Students can use them to explore regrouping. For example, showing that 10 units (ones) can be exchanged for 1 rod (ten), or that 10 rods can be exchanged for 1 flat (hundred), reinforces their understanding of how our number system works.
You can combine it with other math games and make math more interesting for your kid.
Divisions?
They provide an effective way to teach division by helping students visualize the process of splitting a number into equal parts.
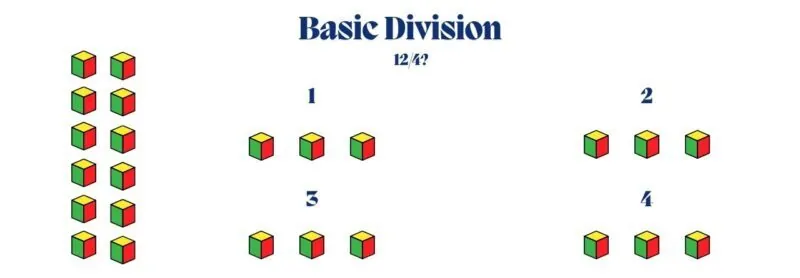
Basic Division:
To illustrate the concept of 12 ÷ 4, students can start with 12 unit cubes. They can physically group the cubes into 4 equal groups, demonstrating that each group contains 3 cubes. This visual representation helps students see that dividing 12 by 4 results in 3.
Using Repeated Subtraction:
For a problem like 20 ÷ 5, students can represent 20 with 2 rods (representing 20). They can repeatedly remove 1 rod (10) until no blocks are left. Each time they remove a rod, they note how many groups of 5 they have formed. After four iterations, they see that 20 ÷ 5 equals 4.
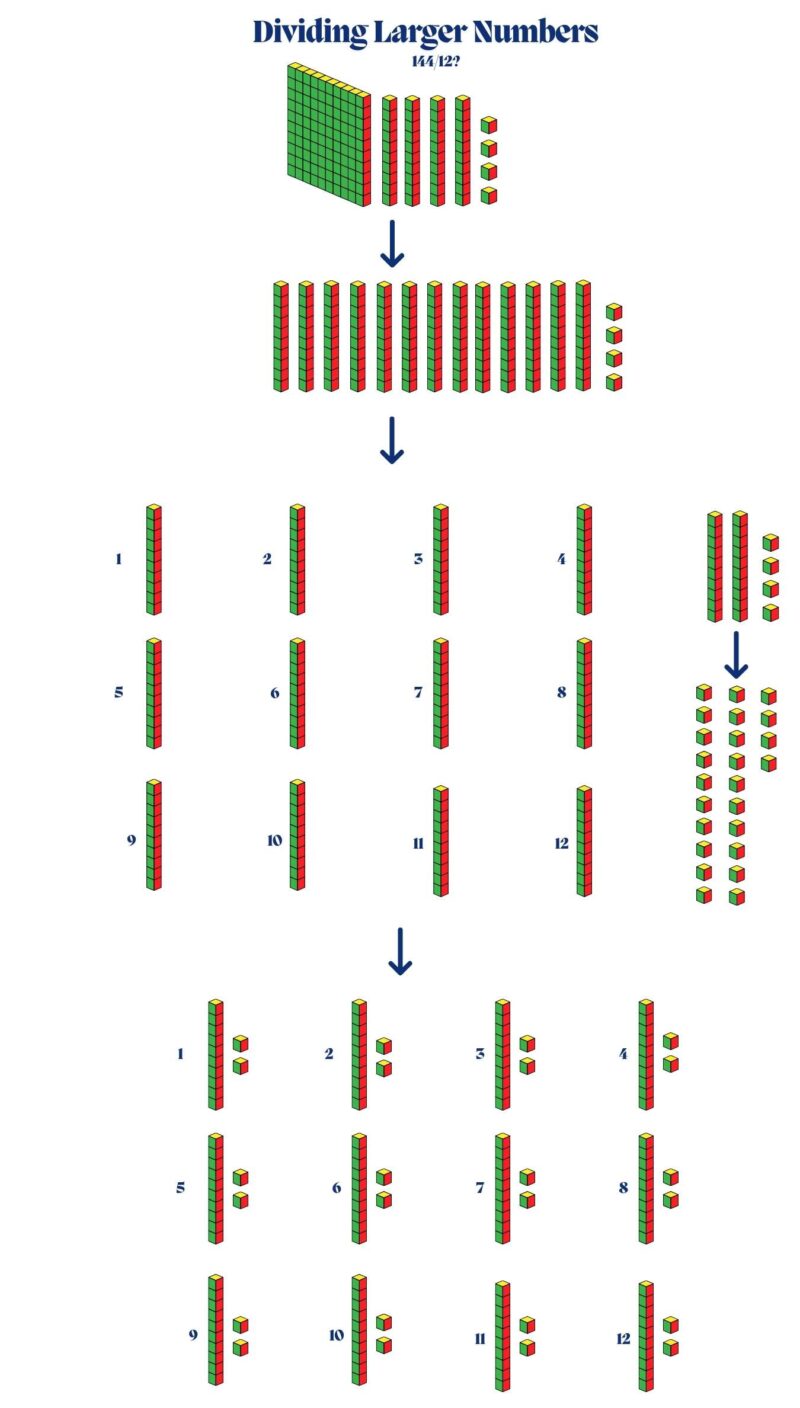
Dividing Larger Numbers:
For a division problem such as 144 ÷ 12, students can use 1 flat (100), 4 rods (40), and 4 units (4) to represent 144. They can group the blocks into sets of 12 by creating a rectangular array with the blocks. As they group them, they can count the number of groups formed, showing that 144 ÷ 12 equals 12.
Decimals
They can also be effectively used to teach decimal concepts, bridging the gap between whole numbers and fractions. By defining the flat as a whole (1), students can visualize and manipulate decimals through the relationships between the blocks.
To represent the decimal 0.5, students can use a flat (representing 1) and divide it into ten equal sections, visually demonstrating that 0.5 is half of 1. They can then represent 0.2 with two of these sections, showing how decimal values correspond to parts of the whole.
When adding decimals like 0.6 and 0.3, students can represent 0.6 with 6 tenths and 0.3 with 3 tenths using rods (each rod representing 0.1).
For a problem like 1.2 − 0.4, students can start with a flat (1.0) and 2 unit sections (0.2) for 1.2. To subtract 0.4, they can physically remove 4 tenths (or 4 rods). After removing the rods, they can see that they have 8-tenths remaining, representing 0.8 as the result.
Volume and Geometry
This simple set of blocks can extend beyond basic arithmetic to help students explore advanced concepts such as volume and geometry.
Students can use the large cubes (representing 1,000) to explore the concept of volume. By filling a larger container with smaller unit cubes, they can physically see that it takes 1,000 unit cubes to fill a cube measuring 10 cm on each side.
Calculating Volume
When learning to calculate the volume of rectangular prisms, students can use them to build a prism with known dimensions. For example, a prism measuring 3 units in height, 4 units in length, and 2 units in width can be constructed using rods and units.
Students can then count the total number of unit cubes used to fill the prism, reinforcing the formula for volume (length × width × height).
Exploring Surface Area
Students can use the blocks to explore surface area by counting the number of unit faces on their constructed prisms. For instance, after building a rectangular prism with dimensions of 2 units high, 3 units wide, and 4 units long, they can calculate the surface area by counting the visible faces. This activity helps them understand the relationship between three-dimensional shapes and their two-dimensional surfaces.
Geometric Properties
These blocks can also aid in identifying and understanding geometric properties. By manipulating blocks to form different shapes, students can investigate attributes such as edges, faces, and vertices. For example, building a cube and counting its 12 edges, 6 faces, and 8 vertices reinforces the definitions and properties of geometric shapes.
Tips for Using Them in the Classroom
- Start with Exploration: Allow students to handle Base 10 Blocks freely before introducing specific lessons. This exploration phase encourages curiosity and helps students become familiar with the different block types and their relationships. Set up stations where students can build numbers or create shapes using the blocks.
- Use Visual Aids: Use place value charts and diagrams alongside Base 10 Blocks. Visual aids reinforce the connection between the blocks and numerical representation, helping students understand how to transition from physical manipulation to written calculations. Displaying charts that illustrate place value will support their learning process.
- Model Problem-Solving: Demonstrate how to solve various math problems using Base 10 Blocks. Walk students through addition, subtraction, multiplication, and division problems step-by-step. By modeling the thought process behind each operation, students will gain confidence in using the blocks to find solutions independently.
- Encourage Group Work: Use Base 10 Blocks for collaborative activities. Assign students to work in pairs or small groups to solve problems or complete tasks. Collaborative learning fosters communication skills and allows students to share different strategies for using the blocks.
- Integrate Technology: If available, incorporate virtual Base 10 Block tools and software into lessons. Digital platforms provide interactive experiences that complement hands-on learning. These tools often include animations that demonstrate regrouping and operations in a visually appealing manner.
- Connect to Real-Life Situations: Create math problems that relate to real-world scenarios where Base 10 Blocks can be applied. For example, use blocks to represent money in a shopping activity or to model how groups of items can be divided evenly. This contextual learning enhances engagement and helps students see the relevance of math in everyday life.
FAQs
What age group can benefit from Base 10 Blocks?
Base 10 Blocks are suitable for students in early elementary grades, typically starting from preschool through fifth grade. They can be adapted for older students when introducing more complex math concepts.
How can I make my own Base 10 Blocks?
You can create DIY Base 10 Blocks using small cubes for units, longer strips for rods, and flat pieces for hundreds. Craft materials like foam or cardboard can be cut into the appropriate sizes.
Where can I buy Base 10 Blocks?
Base 10 Blocks are available at educational supply stores, online retailers, and through school supply catalogs. Many educational websites also offer sets for purchase.
Are there any digital versions of Base 10 Blocks?
Yes, various educational platforms offer virtual Base 10 Block tools and interactive software that simulate the physical blocks, allowing students to manipulate them digitally.
Can Base 10 Blocks be used for teaching fractions?
While Base 10 Blocks primarily focus on whole numbers and decimals, they can also introduce basic fractions by dividing units or flats into equal parts to represent fractions visually.
Last Words
Base 10 Blocks serve as valuable tools for understanding math in a meaningful way. They bring numbers to life through hands-on activities, helping students grasp essential concepts like place value and operations.
When teachers use Base 10 Blocks in their lessons, they create a supportive environment where students feel comfortable tackling challenges.